vendredi 1 juin 2012

ActiveMQ Network broker

To Start ActiveMq in network broker mode:


1- Configuration


$ cd $ACTIVEMQ_HOME/


$vi conf/activemq-dynamic-network-broker1.xml
--> add balise to this config file


$ cp conf/jetty.xml conf/jetty2.xml
$ vi conf/jetty.xml conf/jetty2.xml : update port number of jetty web server
$vi conf/activemq-dynamic-network-broker2.xml
--> add


2 - Developpement (producer and consumer)


- Create consumer:


package com.test.jms;


import javax.jms.Connection;
import javax.jms.Destination;
import javax.jms.ExceptionListener;
import javax.jms.JMSException;
import javax.jms.Message;
import javax.jms.MessageConsumer;
import javax.jms.MessageListener;
import javax.jms.Session;


import org.apache.activemq.ActiveMQConnectionFactory;


public class JmsNetworkBrokerConsumer {

private static ActiveMQConnectionFactory connectionFactory;
private static Connection connection;
private static Session session;
private static Destination destination;
private static boolean transacted = false;
private static String brokerUrl = "failover:(tcp://localhost:61616,tcp://localhost:61618)"; 

public static void main(String ...strings) throws Exception{
connectionFactory = new ActiveMQConnectionFactory(brokerUrl);
connection = connectionFactory.createConnection();
connection.start();
session = connection.createSession(transacted, Session.AUTO_ACKNOWLEDGE);
destination = session.createQueue("common.queue");
MessageConsumer consumer = session.createConsumer(destination);
connection.setExceptionListener(new ExceptionListener() {

public void onException(JMSException exception) {
System.err.println("Error:" + exception);
}
});
consumer.setMessageListener(new MessageListener() {

public void onMessage(Message message) {
System.out.println("New Message : " + message);
}
});
}

}


- And now Create producer


package com.test.jms;


import javax.jms.Connection;
import javax.jms.DeliveryMode;
import javax.jms.Destination;
import javax.jms.Message;
import javax.jms.MessageProducer;
import javax.jms.Session;


import org.apache.activemq.ActiveMQConnectionFactory;


public class JmsNetworkBrokerProducer {   public static void main(String[] args) throws Exception
  {
    // Create the connection
    ActiveMQConnectionFactory connectionFactory = new ActiveMQConnectionFactory(null, null, "failover:(tcp://localhost:61616,tcp://localhost:61618)");
    Connection connection = connectionFactory.createConnection();
    connection.start();


    // Create the Session
    Session session = connection.createSession(false, Session.AUTO_ACKNOWLEDGE);


    // And the Destination queue
    Destination destination = session.createQueue("common.queue");


    // Create the producer
    MessageProducer producer = session.createProducer(destination);
    producer.setDeliveryMode(DeliveryMode.PERSISTENT);
    Message m = session.createTextMessage("hello");


    //Send 3 messages at a time
    //for (int i = 0; i < 3; i++)
     //  producer.send(m);
    producer.send(m);


    //shutdown with NO Error handling
    connection.close();
 }
}


3- Start Servers

--> Start Server 1: 
- $ bin/activemq console xbean:conf/activemq-dynamic-network-broker1.xml
--> port activeMQ 61616, port jetty 8161


--> Start Server 2 : 
- $ bin/activemq console xbean:conf/activemq-dynamic-network-broker2.xml
--> port activeMQ 61618, port jetty 8162


4 - Start consumer : java JmsNetworkBrokerConsumer
5 - Start producer : java JmsNetworkBrokerProducer
mercredi 23 mai 2012

empty linux cache script


empty-linux-cache.sh

#!/bin/bash

###################################################
### Script de purge du cache de la mémoire RAM  ###
###     Auteur: Jamel ESSOUSSI                  ###
###     email: jamel.essoussi@gmail.com         ###
###################################################

echo "Vidage du cache de la mémoire RAM"
echo "1" > /proc/sys/vm/drop_caches
sleep 5
echo "0" > /proc/sys/vm/drop_caches
echo "Vidage du cache terminé ;-)"

bash> chmod +x empty-linux-cache.sh
bash> sudo sh empty-linux-cache.sh

mercredi 8 février 2012

Lucene very good search engine

I- Hello Lucene Example:


package com.ictelecom.lucene.search.test;

import org.apache.lucene.analysis.standard.StandardAnalyzer;
import org.apache.lucene.document.Document;
import org.apache.lucene.document.Field;
import org.apache.lucene.index.IndexWriter;
import org.apache.lucene.index.IndexWriterConfig;
import org.apache.lucene.queryParser.ParseException;
import org.apache.lucene.queryParser.QueryParser;
import org.apache.lucene.search.IndexSearcher;
import org.apache.lucene.search.Query;
import org.apache.lucene.search.ScoreDoc;
import org.apache.lucene.search.TopScoreDocCollector;
import org.apache.lucene.store.Directory;
import org.apache.lucene.store.RAMDirectory;
import org.apache.lucene.util.Version;

import java.io.IOException;

public class HelloLucene
{
public static void main(String[] args) throws IOException, ParseException
{
// 0. Specify the analyzer for tokenizing text.
//    The same analyzer should be used for indexing and searching
StandardAnalyzer analyzer = new StandardAnalyzer(Version.LUCENE_35);

// 1. create the index
Directory index = new RAMDirectory();

IndexWriterConfig config = new IndexWriterConfig(Version.LUCENE_35, analyzer);

IndexWriter w = new IndexWriter(index, config);
addDoc(w, "Lucene in Action");
addDoc(w, "Lucene for Dummies");
addDoc(w, "Managing Gigabytes");
addDoc(w, "lucene test");
w.close();

// 2. query
String querystr = args.length > 0 ? args[0] : "lucene test";

// the "title" arg specifies the default field to use
// when no field is explicitly specified in the query.
Query q = new QueryParser(Version.LUCENE_35, "title", analyzer).parse(querystr);

// 3. search
int hitsPerPage = 20;
IndexSearcher searcher = new IndexSearcher(index, true);
TopScoreDocCollector collector = TopScoreDocCollector.create(hitsPerPage, true);
searcher.search(q, collector);
ScoreDoc[] hits = collector.topDocs().scoreDocs;

// 4. display results
System.out.println("Found " + hits.length + " hits.");
for(int i=0;i
{
int docId = hits[i].doc;
Document d = searcher.doc(docId);
System.out.println((i + 1) + ". " + d.get("title"));
}

// searcher can only be closed when there
// is no need to access the documents any more.
searcher.close();
}

private static void addDoc(IndexWriter w, String value) throws IOException
{
Document doc = new Document();
doc.add(new Field("title", value, Field.Store.YES, Field.Index.ANALYZED));
w.addDocument(doc);
}
}


II- Sample Example (indexing):

This tutorial sketches a small Application. We want to index text Files and then search the files for words. This tutorial will give you an overview and is not intended to be a working application. The code given is not complete.
There are three classes:
  1. One for indexing the files
  2. One for converting File objects to indexable documents
  3. One for searching the index
We will start with the Indexer Class. Lucene uses a IndexWriter for indexing documents. To index an object, the file must be converted to a document with fields, which can be indexable. The FileIndexer class has a index method which gets a File object for indexing.

public class FileIndexer {
public static void index( File file ) { // 1. Convert indexed object to a document // 2. Write document to IndexWriter
// directory, where to store the index // files String indexFile = "/tmp/fileindex";
// to index documents, they are 'written' or added to // an IndexWriter IndexWriter writer = null; try { File f; boolean create = true; // create index if the directory does not exist if ((f = new File(indexFile)).exists() && f.isDirectory()) { create = false; } else { create = true; } writer = new IndexWriter(indexFile, new Analyzer(), create);
writer.mergeFactor = 20; // now add this document to the Index // we use an adapter class, which is given a // file and returns a document, which lucene // can index writer.addDocument(FileDocument.Document(file)); writer.optimize(); } catch(InterruptedException e) { throw new IndexException("Unable to index document.", e); } catch(IOException e) { throw new IndexException("Unable to index document.", e); } finally { close(writer); } }
// close writer public static void close(IndexWriter writer) { if(null != writer) { try { writer.close(); } catch(Exception e) { } } } }

The convertion class used in FileIndexer is easy. It converts the File object to a Lucene document. Usually you use a Class with a static method Document as a factory method.

public class FileDocument {
  // Lucene can only index objects of type
  // Document. So the to be indexed object
  // must be converted to this document,
  // usually with a static method
public static Document Document(File file) { // load content of file, get name, path and date // and store them into content, name, date ...
Document doc = new Document();
DateFormat df = DateFormat.getDateTimeInstance(DateFormat.SHORT, DateFormat.SHORT, Locale.GERMANY);
// we want to index the fields content, name and date // we can then search for "house" everywhere or // "content:house" in content. // fields can be added that are not indexed but // can be acessed at search time. This is e.g. useful // for storing object primary keys etc. doc.add(Field.Text("content", content)); doc.add(Field.Text("path", path); doc.add(Field.Text("name", name); doc.add(Field.Text("date", df.format(message.getSentDate()))); return doc; } }


The FileSearcher class uses the index to find documents.
  1. Get a QueryString
  2. Get an IndexSearcher
  3. Parse the Query
  4. Give the parsed Query to the IndexSearcher 
  5. The IndexSearcher will return an Array with matching documents, sorted by hit quality


// Get the query String e.g. from the comand line
    ...
// Create a searcher from the index file String indexFile = "/tmp/fileindex"; Searcher searcher = null; try { searcher = new IndexSearcher(indexFile); } catch(IOException e) { System.out.println("Unable to open index file: " + indexFile); System.exit(1); }
// parse the query String. Query query = null; try { // If no prefix for a word is given, then search in // content by default query = QueryParser.parse(queryString, "content", new Analyzer()); } catch(ParseException e) { close(searcher); System.out.println("Unable to parse: " + queryString); System.exit(1); }
// get the hits from the searcher for // the given query Hits hits = null; try { hits = searcher.search(query); } catch(IOException e) { close(searcher); System.out.println("IO Error."); e.printStackTrace(); System.exit(1); }
// iterate over the results // the results are an array of document try { // display the first 10 results int start = 0; final int HITS_PER_PAGE = 10; int end = Math.min(HITS_PER_PAGE, hits.length());
if(hits.length() > 0) { PrintfFormat pf = new PrintfFormat("%-20s %-30s %-30s"); System.out.println(pf.sprintf(new Object[]{"Date","Subject","To"})); for(int i = start; i < end; i++) { System.out.println(pf.sprintf( new Object[] { // retrieve the indexed Fields from the result documents. // we could also get a persisten object key and load // the objects for further attributes to display hits.doc(i).get("path"), hits.doc(i).get("name"), hits.doc(i).get("date")})); } } else { System.out.println("No matching files found."); }

vendredi 27 janvier 2012

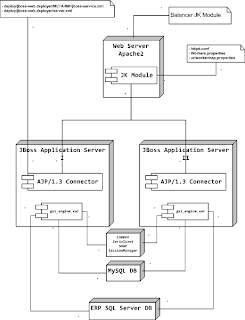
Load balancing JK - apache2 - JBoss


Sommaire

  • 1 Produits utilisés
  • 2 Schéma de déploiement du Load Balancer
  • 3 Installation du module apache2 JK
  • 4 Configuration du module JK
  • 5 Configuration des serveurs JBoss & activation du protocole AJP/1.3

 Produits utilisés

- JBoss 4.2.3 GA
- Apache2.2.x
- module apache2 JK 1.2.31


Schéma de déploiement du Load Balancer

Installation du module apache2 JK

1- Télécharger le module apache2 suivant : mod_jk-1.2.31-httpd-2.2.x.so ou
wget http://mirror.ibcp.fr/pub/apache//tomcat/tomcat-connectors/jk/binaries/linux/jk-1.2.31/i386/mod_jk-1.2.31-httpd-2.2.x.so
2- Copier le fichier .so dans le répertoire module du server web apache
cp mod_jk-1.2.31-httpd-2.2.x.so /usr/lib/apache2/modules/mod_jk.so

Configuration du module JK

1- Dans le fichier httpd.conf du server web apache2, ajouter les lignes suivantes : /etc/apache2/httpd.conf
LoadModule jk_module /usr/lib/apache2/modules/mod_jk.so

# Where to find workers.properties
# Update this path to match your conf directory location (put workers.properties next to httpd.conf)
JkWorkersFile Workers.properties
# Where to put jk shared memory
# Update this path to match your local state directory or logs directory
JkShmFile logs/mod_jk.shm
# Where to put jk logs
# Update this path to match your logs directory location (put mod_jk.log next to access_log)
JkLogFile logs/mod_jk.log
# Set the jk log level [debug/error/info]
JkLogLevel info
# Select the timestamp log format
JkLogStampFormat "[%a %b %d %H:%M:%S %Y] "
#JkMount /* loadbalancer
#JkMount /index.php loadbalancer
#JkMount /jmx-console/* loadbalancer
#JkMount /jkstatus loadbalancer
JkMount /gsi_engine/* loadbalancer

        StartServers 5
        MaxClients 150
        MinSpareThreads 25
        MaxSpareThreads 75
        ThreadsPerChild 25
        MaxRequestsPerChild 0

2- Créer le fichier Workers.properties dans /etc/apache2/
# Define 1 real worker using ajp13

worker.list=loadbalancer,status
# Set properties for worker1 (ajp13) JBoss 1
worker.worker1.type=ajp13
worker.worker1.host=10.0.3.61
worker.worker1.port=8109
worker.worker1.lbfactor=1
worker.worker1.connection_pool_size=10
worker.worker1.redirect=worker2
# Set properties for worker2 (ajp13) JBoss2
worker.worker2.type=ajp13
worker.worker2.host=10.0.3.58
worker.worker2.port=8109
worker.worker2.lbfactor=1
worker.worker2.connection_pool_size=10
#fonctionnement de l'equilibrage de charge
worker.loadbalancer.type=lb
worker.loadbalancer.balance_workers=worker1,worker2
worker.loadbalancer.sticky_session=True
worker.status.type=status
# Disable worker3 for all requests except failover
worker.worker2.activation=disabled
3- Créer le fichier uriworkermap.properties dans /etc/apache2/
/status=status
4- Créer le répertoire de log pour le module JK
mkdir /etc/apache2/logs
5- Redémarrer le server apache2
/etc/init.d/apache2 restart

Configuration des serveurs JBoss & activation du protocole AJP/1.3

Pour chaque Serveur JBoss, il faut faire 1- Dans le fichier de config $JBOSS_HOME/server/$SERVER_INSTANCE/deploy/jboss-web.deployer/META-INF/jboss-service.xml, modifier la balise suivante :
false
true
2- Dans le fichier de config $JBOSS_HOME/server/$SERVER_INSTANCE/deploy/jboss-web.deployer/server.xml, décommenter le bloc suivant pour activer l'AJP/1.3 :
    

3- Redémarrer le server JBoss
/etc/init.d/jboss restart

jeudi 12 janvier 2012

Apache Thrift Example


- Used third party tools
  • Eclipse
  • thrift-0.8.0
  • JDK1.7
1- Download thrift-0.8.0.exe from the following url (http://www.apache.org/dyn/closer.cgi?path=/thrift/0.8.0/thrift-0.8.0.exe)


2-  Create the thrift description file:


time.thrift


# time.thrift
namespace java tserver.gen
typedef i64 Timestamp
service TimeServer 
{
   Timestamp time()
}


3 - Generate the java classes for server and client


Command:
> thrift-0.8.0.exe --gen java time.thrift
-> We will find all java generated classes in gen-java directory


4- Implements Iface server class:


package com.sample.thrift.server;


import org.apache.thrift.TException;
import tserver.gen.*;


class TimeServerImpl implements TimeServer.Iface 
{
   @Override
   public long time() throws TException 
   {
      long time = System.currentTimeMillis();
      System.out.println("time() called: " + time);
      return time;
   }
}


5- Create server class:


Server.java


package com.sample.thrift.server;


import java.io.IOException;
import java.net.InetAddress;
import java.net.UnknownHostException;
import org.apache.thrift.protocol.TBinaryProtocol;
import org.apache.thrift.protocol.TBinaryProtocol.Factory;
import org.apache.thrift.server.TServer;
import org.apache.thrift.server.TThreadPoolServer;
import org.apache.thrift.transport.TSSLTransportFactory;
import org.apache.thrift.transport.TSSLTransportFactory.TSSLTransportParameters;
import org.apache.thrift.transport.TServerSocket;
import org.apache.thrift.transport.TTransportException;
import tserver.gen.TimeServer;


public class Server
{
private void startSampleServer()
{
try 
{
TServerSocket serverTransport = new TServerSocket(7911);         
TimeServer.Processor processor = new TimeServer.Processor(new TimeServerImpl());
Factory protFactory = new TBinaryProtocol.Factory(true, true);
TServer server = new TThreadPoolServer(new TThreadPoolServer.Args(serverTransport).processor(processor).protocolFactory(protFactory));
System.out.println("Starting server on port 7911 ...");
server.serve();

catch (TTransportException e) 
{
e.printStackTrace();
}
}


private void startSslServer()
{
try 
{
TSSLTransportFactory.TSSLTransportParameters params = new TSSLTransportFactory.TSSLTransportParameters();
params.setKeyStore("C:/Users/jamel/eclipse.helios.workspace/ThriftClientServer/certificat_ssl/saskeystore.jks", "sas001");
TServerSocket serverTransport = TSSLTransportFactory.getServerSocket(7912, 10000, InetAddress.getByName("localhost"), params);
TimeServer.Processor processor = new TimeServer.Processor(new TimeServerImpl());
Factory protFactory = new TBinaryProtocol.Factory(true, true);
TServer server = new TThreadPoolServer(new TThreadPoolServer.Args(serverTransport).processor(processor).protocolFactory(protFactory));
System.out.println("Starting server on port 7912 ...");
server.serve();

catch (TTransportException e) 
{
e.printStackTrace();
}
catch (UnknownHostException e) 
{


}
}


public static void main(String args[])
{
Server srv = new Server();
//srv.startSampleServer();
srv.startSslServer();
}
}


6- Create Client Class:


TimeClient.java

package com.sample.thrift.client;


import org.apache.thrift.TException;
import org.apache.thrift.protocol.TBinaryProtocol;
import org.apache.thrift.protocol.TProtocol;
import org.apache.thrift.transport.TSSLTransportFactory;
import org.apache.thrift.transport.TSocket;
import org.apache.thrift.transport.TTransport;
import org.apache.thrift.transport.TTransportException;
import tserver.gen.TimeServer.Client;


public class TimeClient 
{
private void startSampleClient()
{
TTransport transport;
try 
{
transport = new TSocket("localhost", 7911);
TProtocol protocol = new TBinaryProtocol(transport);
Client client = new Client(protocol);
transport.open();
long time = client.time();
System.out.println("Time from server:" + time);
transport.close();
}
catch (TTransportException e) 
{
e.printStackTrace();
}
catch (TException e) 
{
e.printStackTrace();
}
}


private void startSslClient()
{
TTransport transport;
try 
{
TSSLTransportFactory.TSSLTransportParameters params = new TSSLTransportFactory.TSSLTransportParameters();
params.setTrustStore("C:/Users/jamel/eclipse.helios.workspace/ThriftClientServer/certificat_ssl/sastruststore.jks", "sas001");
transport = TSSLTransportFactory.getClientSocket("localhost", 7912, 10000, params);
TProtocol protocol = new TBinaryProtocol(transport);
Client client = new Client(protocol);
//transport.open();
long time = client.time();
System.out.println("Time from server:" + time);
transport.close();
}
catch (TTransportException e) 
{
e.printStackTrace();
}
catch (TException e) 
{
e.printStackTrace();
}
}


public static void main(String[] args) 
{
TimeClient c = new TimeClient();
//c.startSampleClient();
c.startSslClient();
}
}


7- Create keystore and trustore for SSL


createSQSKeystoreaAndTruststore.bat


@echo off


if "%JAVA_HOME%" == "" (
set "JAVA_HOME=C:\Program Files\Java\jdk1.7.0\"
)
set "KEYTOOL_CMD="%JAVA_HOME%bin\keytool.exe""


rem créer le fichier de keystore
%KEYTOOL_CMD% -genkeypair -alias sascertificatekey -keyalg RSA -validity 7 -keystore saskeystore.jks -storepass sas001 -keypass sas001
echo saskeystore.jks crée


rem créer le fichier cert.cer
%KEYTOOL_CMD% -export -alias sascertificatekey -keystore saskeystore.jks -rfc -file cert.cer -storepass sas001 -keypass sas001
echo cert.cer crée


rem créer le fichier de sastruststore
%KEYTOOL_CMD% -import -alias certificatekey -file cert.cer -keystore sastruststore.jks -storepass sas001 -keypass sas001
echo Certificat importée avec succée


@pause


END